The Complete Guide To Starting Seeds Indoors

From Together We Bloom,
a Small Flower-Farm and Market Garden in Ogden, Utah
About This Blog Post
Originally Published January 20, 2023. Every year I come back and add some new information and update it, checking that the links are still active. However, if you find a broken link or outdated information please let me know (hello@together-webloom.com). Enjoy:
Now that we find ourselves at the beginning of the year, we are actively planning the season ahead. For me, it is a fun time of year because the physical labor side of farming is low but the mental labor side is high. I love this planning, daydreaming, and preparation period.
In January and February, we gather everything we need to start our seeds: we make our purchases, organize and clear out old supplies, make our seeding schedule, and then we begin starting seeds at the end of February/beginning of March.
I thought it would be fitting to share the supplies (and some tips) that we use for starting thousands of seeds in our basement each season for our farm. Now I understand that starting seeds indoors isn’t for everyone, it is an investment to get a setup going. For many home gardeners, it might make more sense to purchase seedlings from your local nursery or local farmer than starting your own.
My intention here is to create the blog post that I wish I had when I was starting out, to walk you through the full process of starting seeds and have all of the considerations and decisions in front of you in one place. My goal here is to provide links to all of the things we actually use.
It is worth saying that this is not the only way to do things, but it is how we have found some success in doing things. There are always new tools and innovations coming out and each year we try and improve our methods. I hope you enjoy this blog post.
♥With love, Taylor and your friends at Together We Bloom
Amazon Affiliate Link Disclaimer: There are many ways that you can support our small farm: and one is by purchasing items through our Amazon affiliate links. The items pictured below are through our Amazon Affiliate Links. If you appreciate the information that we put together here, and are interested in any of the products below, please consider clicking the links to purchase the items. Don’t worry, we only promote items that we actually use, recommend, and believe in, and buying from these links is at no extra cost to you. We still believe in supporting your local makers, artisans, and businesses 100% but we do rely on Amazon as well. So you might as well support a small farm while purchasing from Amazon. Each purchase made through these links contributes a very small amount of money to our farm.
Methods for Starting Seeds:
There are countless methods for starting seeds- we are going to highlight the two methods that we actually use on our small farm: Soil Blocking and Growing in Plug Trays.
Soil Blocking for Seed Starting:
You may or may not have heard of Soil Blocking. It has become popular, especially for those of us who don’t have a lot of space to dedicate to seed starting.
Essentially you use a hand tool (soil blocker) and a wet soil mixture to form little square blocks of soil. You then sow your seeds into these small blocks and grow them on flat trays, carefully watering them from the bottom so that you don’t dislodge the soil.
If you are unfamiliar with soil blocking and want to learn more, our two favorite content creators and educators on this subject are: Blossom and Branch Farm and The Gardener’s Workshop.
The Basics: While you can make different sizes of soil blocks, most people only use and need a small soil blocker. They seem tiny but that is what makes them so great. Alternatively, the 2” is the next most common size since it has attachments so that you can set a small soil block directly inside of the 2 inch blocks, for easy up-planting. Many people only use the small-sized soil blocks and plant them directly outside at this small size, never moving them into larger soil blocks. We have found that the 2” soil blocks are still useful for some larger seeds (sweet peas, squash, sunflower seeds, etc.)
Benefits of Soil Blocking: Soil blocks don’t require as much soil or space as traditional plug trays. They maximize the number of seeds you can start in a small space. The supplies are compact and easy to store when not in use. Seedling ‘air prune’ their roots instead of getting root-bound, allowing them to produce healthy roots. This also makes them a great option for those plants that don’t like to be transplanted- they often still do well in soil blocks. The seedlings are generally faster growing. And- if you have poor germination, you haven’t wasted much space under lights or on a heat mat.
Cons/Potential Cons of Soil Blocking: It is more labor and time-intensive to make the blocks than it is to fill plug trays with soil. You will need a fine soil medium which often requires extra sifting. It can have a learning curve in getting the proper moisture levels. Finding and choosing a soil mix can be intimidating. It can still feel like a hefty investment to get started. The 2” soil blocks are not ‘space savers’ and generally take up more space per seedling than a plug tray would. If for some reason, you need to up-plant the small soil blocks
Soil Blockers That We Use: There are several sizes of soil blockers. We use the small (3/4”) soil blocker to seed 95% of the flowers and vegetables that we grow on the farm (linked below.) We started out by purchasing the set (linked below) of the small soil blocker and the 2” soil blocker with supplies.
Upgrades: They now make a stand-up soil blocker (linked below.) If you anticipate making tons of soil blocks, this may be something to consider. When we are making thousands of soil blocks in an afternoon, our hands and wrists can get tired. It would be nice to have another option that changes how we move our bodies. Additionally- I purchased a ‘swift blocker’ soil blocking tool an American-made soil blocking tool that allows you to make soil blocks quickly on 1020 trays and with less toll on your body. They also make their own seeding accessories to make the entire process speedy. It was an expensive upgrade for our small farm but if you do a lot of soil blocking, a great thing to consider that will last forever.
Trays for Soil Blocking: There are endless options for trays for soil blocking. In general, we recommend flat-bottomed trays rather than using the 1020 trays (which often have water divets.) Use what you can find and afford for this- you can totally reuse plastic packaging from food items. I have tons of reusable tupperware that I like to use for 20-40 soil blocks at a time (linked below) because they have a lid that you can use for easy germination. We also like to use these Ikea lunch trays for varieties where we are starting 100-200 blocks at a time. If we are starting 100 seeds or less, we like the terracotta trays (linked below) or our favorite trays, the colorful ones (linked below.)
Other Helpful Supplies: Because the small soil blocks are super tiny, having too many chunks in your soil mix can really inhibit germination and make the soil blocks shape incorrectly. Having a soil sifter on hand will help you to be prepared when you come across chunks in your soil mix that are difficult to work with (linked below.)
Another supply you might consider is mesh bottom trays (linked below). We like to use these for the 2” soil blocks. This allows us to set the tray of soil blocks on top of another 1020 tray to soak up water and then lift the entire tray out once the soil blocks have absorbed their water.
You will also want some kind of container to mix your soil and water in and to make your soil blocks. We thrift plastic totes and tubs to do this in but I will place a link below to see what we mean.
And you will certainly benefit from having some kind of bench scraper (linked below) to compact the soil blocks and move them around.

Terracotta Trays:
Colorful Trays:


Tupperware:
Soil Sifter
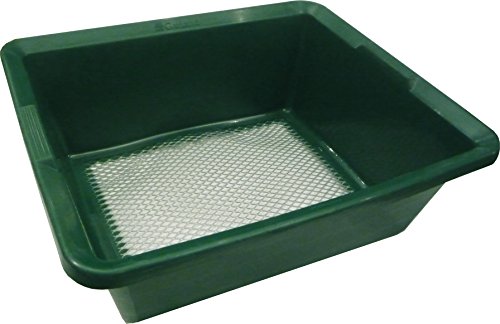
Mesh Trays:
Plastic Tub:


Scraper:
Small Soil Blocker:


Soil Block Set:

Stand Up Soil Blocker:
Plug Trays For Seed Starting:
Most people tend to gravitate towards starting their seeds in plug trays as the supplies are readily available.
Benefits of starting seeds in plugs: It is quick and easy to get the soil and seeds in the trays. This is a great method for people who are growing a whole tray of zinnias, a whole tray of tomatoes, a whole tray of anything. It makes germinating, growing, watering, and transplanting your seedlings organized and streamlined. Especially if you have enough space to have the plug tays. You can overhead water or bottom water and they are easy to put plastic domes on for germination.
Cons / Potential Cons of starting seeds in plug Trays: These plug trays take up a decent amount of storage space when they are not in use. They are often made of flimsy plastic so in order to be environmentally conscious, you have to be kind of gentle on them so that you can use them year after year. It is not a good idea to sow 17 different types of plants on a single tray because they all germinate and grow differently. If you don’t have a lot of space to dedicate to a garden or seed starting, this may not be the most effecient use of space. (see our notes below on using cell trays in a small space.) If you are using these indoors (under lights) you will also need bottom trays so that they don’t drip so this does add an estra expense and supply to store.
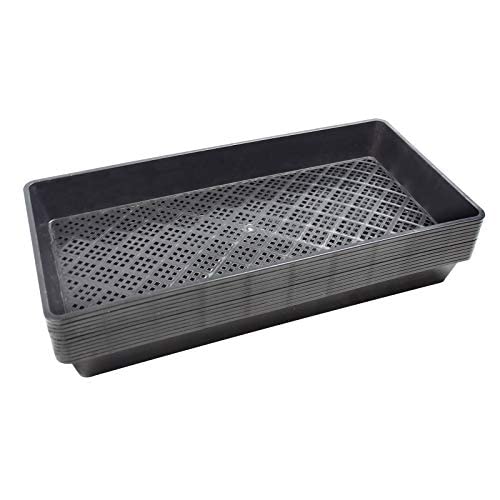
The Plug Trays That We Use: We mostly use 128 plug trays for seed starting, but we do also use 72 plug trays and 50 plug trays as well. I will link some that we have purchased from amazon below but I like to shop around and sometimes have used these deep 128 trays from Harris Seeds.
How to Grow with Plug Trays in a Small Space: If you have a small indoor space that you are using to start seeds or a small garden, you likely do not need to grow 128 snapdragons, 50 zinnias, and 50 tomatoes. Because different plants (and even different varieties of the same plant type) often germinate and grow at different rates, it can be difficult to mix and match your trays. My tip is to cut your trays into strips and use deep 1020 trays (linked below) to hold them up together, like a puzzle.
Bottom Trays: You will need to have some kind of tray underneath your plug trays (with no holes in it) to catch water droplets that run off. In the begining, we purchased and used 1020 trays. We had issues with them cracking and sometimes being too deep. We have since switched to use shallow 1020 trays to go underneath our plug trays (the shallow ones are often used for microgreens- but make sure there are no holes in them as some have holes for microgreens an some do not.) These ones linked below are much more sturdy. Short term, they will cost more but because they are more durable, they are actually a cheaper and more sustainable choice long term. I will link the one below that we have love but we also have a bunch of these industructable trays from Neversink Farm that are also compatable with the paper pot transplanter.
128 Cell Trays:
72 Cell Trays:

Classic 1020 Trays:


50 Cell Trays:
Shallow Bottom Trays:


Soil Mixtures For Seed Starting:
I know (personally) how easy it is to get overwhelmed with choosing your seed starting medium. I could probably make this section an entire blog post but let’s try to keep it simple. You can either purchase pre-made seed-starting soil mixes or make your own.
Here are the main considerations that I suggest taking into account when choosing whether to make your own soil mix or buy already-made soil mix:
What scale are you working on? If you are a farmer or running a larger garden, you may be less inclined to make your own soil mix than if you are a small gardener.
Storage: Do you have the space to store the various ‘ingredients’ of making your own soil? Or would you rather just have one thing to buy and store?
Choice of ingredients: If you have specific soil ingredients that you want to include or exclude, making your own soil mixture will allow you to do just that. While there may be soil mixes out there that fit your criteria, it will be more limited.
Accessibility: Do you want to be able to run to a local shop near you and get some in case you run out? Or do you not mind needing to source it somewhere online?
Cost: Is it more important to you to have a low initial cost? Or would you rather purchase things in bulk to make it more cost-effective over time?
Something Important to Understand: While we are often using the term ‘soil’ when describing a seed-starting mixtures, most don’t actually contain any soil in them. This is because seeds and seedlings have specific needs for germination and root growth. Many of these mixtures have been formulated for baby plants and contain different ingredients than potting soil mixes that you may also see. The choice is yours, and feel free to experiment, but if you find that you are struggling with growing healthy seedlings, experimenting with your choice of seed-starting soil mixture may help.
Using Premade Soil: Disclaimer, I have never actually purchased and relied on premade mixes but most of my gardener and farmer friends do. If you grow on a larger scale, getting compressed bales of soil mixes is the most common approach. You can get them at different farm and nursery suppliers or sometimes your local nursery will sell you one. I know folks here in Utah who get it at Steve Regan. If you grow on a smaller scale, you can find seed starting mixes anywhere you can purchase gardening supplies and it may be easier to grab one locally than it is to purchase one online.
Why Haven’t I used a Premade Seed Starting Mix? Peat moss has been banned in several countries around the world. It and has enormous environmental impacts as is heavily used in the garden industry- specifically in seed starting mixes. Remember how I said that seed-starting soil doesn’t actually contain soil? That is because it uses peat as a base instead. Check out this educational page to learn more about peat and why going peat-free is something to consider. I mean no shame to those that use peat as it is by far the industry standard, but at this time we have made it work on our farm without peat-based soil mixtures.
A peat-free, premade option: There is a (somewhat) widely available peat-free potting soil mix available that I will link below. Please note that it is potting soil and not specifically seed starting mix. It is not necessarily the cheapest option (making your own peat-free mixture would definitely be more cost-effective.) However, if you don’t need to start too many seeds or like the convenience of a premade mix this is a great choice. Blossom and Branch’s Youtube Video talks about how they use this peat free potting mix and wool pellets. to start all of their seedlings. (I love love love these wool pellets. They are from a farm local to us and we use them for fertilizing our dahlias and tomatoes at planting and for seed starting. learn more about their wool pellets here.)
The Benefits of Making Your Own: Making your own seed starting mix is often cheaper in the long run and it allows for customization. It is the same ingredients that you would use to make a soil mix for potted plants and house plants so if you have lots of different kinds of plants in your care, you can use the same basic ingredients in different ratios.
I will include the ingredients below that I try to keep on hand for making my soil mixes:
Compost: In both soil blocking and plug trays, I do use compost in my seed starting mixes and like to keep some on hand. I suggest grabbing whatever you can make or source locally and affordably. We use our city’s green waste compost because it is local, well broken down, and cheap. However, if it is not available I grab a bag of mushroom compost from lowes.
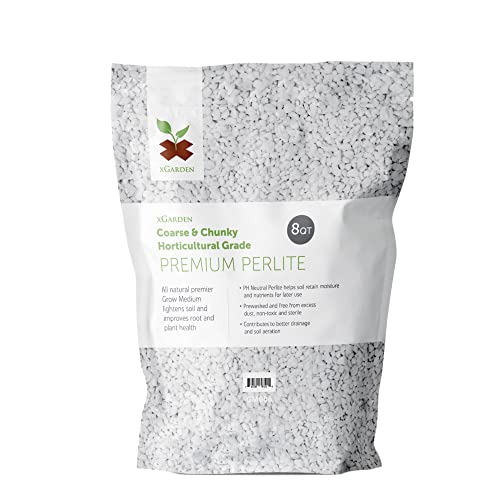
Perlite (linked below): Perlite is an important addition for aeration and drainage in your potting mix. Even when I use bagged potting soil mix for my potted plants, I still almost always add more perlite to it. Please note that perlite dust can be harmful to your lungs, I recommend wearing a mask.
Coconut Coir This is our preferred method of replacing peat moss in our seed starting mix. Coconut coir is a byproduct of the coconut agriculture industry. It comes in compressed blocks that grow 3-5x in size when hydrated. I will link my favorite one below that I like to buy because not all coconut coir is created equally and we have had some duds. You will need some kind of tote or plastic tub to hydrate your block in. I use an old storage bin and pour a couple of inches of water in the bottom of it, set my block in, and let it soak up the water. You will then be able to pull of the dry top and set it to the side and use the hydrated coconut coir at the bottom of the tote.
Wool Pellets: I mentioned the wool pellets from wild valley farms a little bit above, but they are a fantastic product (linked below.) They are local to us, the next county over, and when chatting they told me to use the wool pellets in 1:20 ratio in my seed starting medium. They said that I could just use wool pellets and coconut coir in plugs for seed starting but I have never actually don’t that, I have always made my own mix. I know that this product is pricey, but the large bag will last you for a long time in the 1:20 ratio. The two reasons I will continue to use these are 1: I need to water much less frequently when using wool pellets. The water retention is wonderful and not in a claggy way. I am pretty sure I could go 5 days without watering my plug trays compared to when I don’t use them only going 1-2 days. 2: The rare benefit of both quick and slow release organic fertilizer. Wool Pellets are the only known fast and slow release organic fertilizer, it is truly incredible if you look at the studies done on this stuff from universities. I now use this primarily as my ‘fertilizer’ additive to my soil mixes since it will feed your seedlings up until they are planted and continue to provide nutrients after planting. I also use these wool pellets in the planting holes for my dahlias, tomatoes, and larger plants and they will feed for the whole season. learn more about their wool pellets here.
Optional Additives:
Mycorrhizal fungi (linked below) come in powder form and is beneficial to add into your seedling mix because these funghi form a symbiotic relationship with plant roots, helping them absorb water and nutrients more efficiently. In return, the fungi receive sugars produced by the plant through photosynthesis. This partnership enhances seedling growth, improves drought resistance, and boosts overall plant health by increasing nutrient uptake and disease resistance. We use it in all of our seed starting mixes.
Greensand: (linked below) is a natural mineral that improves soil structure and provides micro nutrients and trace minerals. It also helps retain moisture and improves aeration in the soil. For seedlings, greensand can promote healthy root development, boost growth, and enhance overall plant health. It’s non-toxic and slow-releasing. You can mix a small amount into your soil mix.
Kelp powder (linked below) has trace minerals, vitamins, amino acids, and growth hormones like cytokinins, which can promote strong root development, improve plant vigor, and boost overall growth. It also enhances the soil's microbial life, which helps improve nutrient availability. For seedlings, kelp powder can help improve stress tolerance and boost immunity, making them healthier in the long run. We sprinkle some in our soil mix.
Creating your recipe: Now that you have some ingredients, you may have to play with your own ratios. I suggest you start by making small batches at first until you find what you like. There are lots of recipes out there on the internet but I am happy to share the rough base of mine below. Each batch that I make is a little different as I work more towards the right texture than I do to the recipe. Depending on if you are soil blocking or starting your seedlings in cell trays, you may need to make changes.
Our Recipe: to measure this out, use a Tupperware or scoop of some kind so that each part is equal. When you are ready to make larger batches you can use larger scoops or Tupperware but keep the ratios the same. You want it to be a 20 part recipe total. Once you have all of the ingredients together you can mix it all up with your gloves and start using it.
Wool Pellets: 1 part (Prep this part first- Use a container and an electric kettle to pour hot water over the dry pellets. This will soften and expand the pellets so that they can distribute. Let them cool and expand while your prep the rest of the ingredients)
Compost: 7-10 parts (compost can become hydrophobic if it has become dry. What this means is that water will run off of it. I usually add this to my container first so that I can add water to it. You will want to put on some gloves and mix it up until it is evenly moist. If it is hydrophobic, you may need to let it sit in the water for a little bit until it can slowly absorb the water)
Perlite: 5 parts (put on your mask for this part because perlite dust can damage your lungs.)
Coconut Coir: 5-8 parts *hydrated coconut coir, see above for notes on hydrating it.
Optional: Mycorrhizal Fungi: 1-2 tablespoons per gallon of mix
Optional: Greensand: 1-2 tablespoons per gallon of mix
Optional: Kelp Powder: 1 tablespoon per gallon of mix
A Note On Soil ‘Sterilization’ There seems to be some folks who believe that seeds need to be started in a sterile environment. There are ‘hacks’ shared all over the internet from baking the soil in your oven, steaming, pouring boiling water, etc. We do not sterilize our soil and after hearing opinions from other industry leaders, have heard them say the same thing. Soil is not meant to be sterile by nature, this is not an essential step to worry about.
Soil Blocking Soil Tips: If you are using a soil mix for soil blocking, you will need it pretty wet. To test your soil, I like to try to make a small snowball in my hands by squeezing a handful of soil mix. If water does not come dripping out freely, it is not wet enough. If it does not compact, it is not wet enough. When you make the soil blocks, you really need to compact that soil into your blocks so that they are firm.
Plug Tray Soil Tips: You want your soil to be moist when you put it in your plug trays. Pour the mixture over the top and lift / drop your tray to settle the air pockets and repeat. Do not compact the soil down from the top or your roots and plants will struggle. I usually leave some space at the top of the cells to top with vermiculite after sowing the seeds (more on that below)


Sowing and Germinating Your Seeds:
Now it is finally time to sow your seeds and get them germinating. Below I will link some of my favorite supplies and tips for sowing your seeds and germinating your seeds.
Sowing Your Seeds
Surface Sowing vs Poking Holes to Sow in the Soil: When it comes time to start your seeds, make sure you understand if your seeds need to be sown on top of the soil or inside of the soil. Reputable seed companies will provide this information on the seed pack but the rule of thumb is: tiny seeds are surface sown. Larger seeds are submerged into the soil.
Sowing the Seeds: We currently seed everything by hand. Myself- I prefer to drop seeds directly from the seed bag by squeezing the edges of the seed envelope with my thumb and middle finger to create a point, and then using my pointer finger to tap the top, dropping one seed with each tap. (I will have to model this on our Instagram stories, it takes a little practice but it is the fastest way to seed.) We also have some of the little plastic seeders (linked below) which require a similar method as described above but instead of tapping the envelope, you tap the seeder.
Getting the Most out of your Seeds: Now it is up to you to decide if you want to sow one seed or several for germination. For soil blocking, we sow one seed per block. For plug trays, we generally do a couple seeds per plug tray. In general, we find it is better to buy more seed than you actually need to plant, that way you have wiggle room in your germination.
Labeling Your Seedlings: We use popsicle sticks (linked below) marked with a permanent marker to label our seedlings. We write the variety of the seed and the date of sowing the seeds on the popsicle stick. Then we either put the stick in the soil (for trays) or on the tray (soil-blocking) so we can keep track of everything.
Maintain Moisture with Vermiculite: While vermiculite is technically optional, I would never choose not to use it. For the If seeds need light to germinate you can still sprinkle a light layer of the top of the seeds. (linked below)

Hand Seeders:

Labels:

Vermiculite:
Setting up a Germination Station:
Once you have sown your seeds, it is time to provide them with the ideal environment for germination. There are two key factors to consider for seed germination: temperature and moisture. I have found that we have better germination when we do not germinate our seedlings under grow lights, and instead create a separate germination station for them.
Do I need a germination station? While not completely necessary,a germination station is a great way to increase the germination rate of your seeds. Let’s face it, if you are paying for seeds and the necessary supplies to start the seeds, you want to do everything that you can to ensure that your seeds will germinate and grow into big, strong, healthy plants.
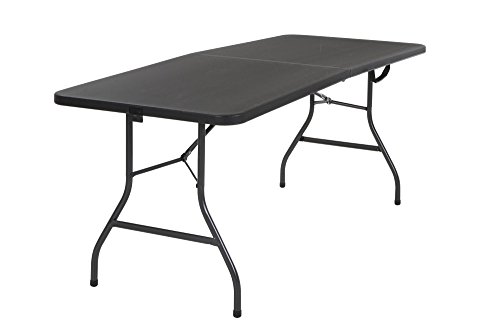
How do you use your germination station? For our setup, we put our freshly sown seeds on our ‘germination station,’ consisting of folding tables with heat mats and humidity domes. Once the tray itself has 50%-75% germination, we move the tray from the germination station to our shelving unit with grow lights.
Folding Tables as Our Base: (linked below) We use folding tables as the base of our germination station. Depending on how many seeds you are starting at one time, and how many heat mats you need, this may or may not be the right choice for you. Our heat mats are 5 feet long so we use 3, 6-foot-long tables for our setup. Realistically, any tables (or using the ground) are also perfectly ok places to set up a germination station. I have found that buying folding tables at Walmart is generally the cheapest place to get them.
Germination Needs: All plants have their own germination temperature range and ‘days to germination.’ When the ideal germination temperature has been met (for the required number of days,) germination can then occur. If this seems like new information to you- consider buying seeds from companies that provide this information on the seed pack will make germination much easier.
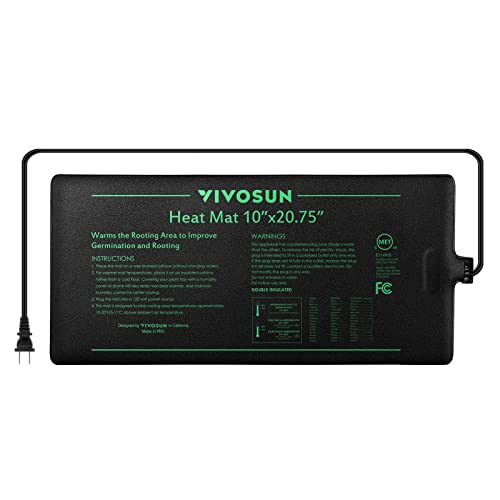
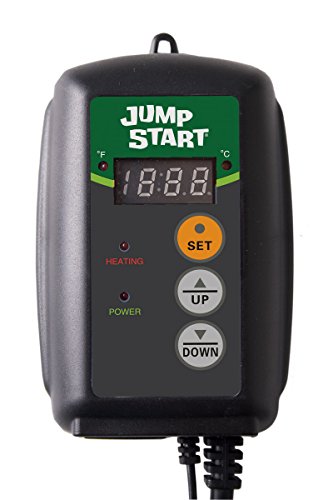
Using a heat mat for Temperature Control: The average temperature for most seeds to germinate is around 70 degrees Fahrenheit ( note that this is the soil temperature and not the room temperature.) Heat mats are the best way to ensure warm soil for germination to take place. The reason that professional growers use heat mats is that it DOES make a difference. Even if you decide not to create a germination station, I do not advise that you use heat mats and grow lights at the same time. Just using a heat mat is enough for germination.
Heat Mats For Beginners/Small Scale Growers If you are new to growing indoors or if you are not sure if you want to make a large investment you can certainly try germinating under grow lights instead of on heat mats. Observe how your germination rate is. If you are not getting great germination, try investing in 1 or 2 small heat mats to see if you get better germination. We have linked a single and double pack of heat mats below that we purchased our first year of growing indoors.
Heat Mats For Intermediate/Mid Scale Growers: If you are more serious about growing indoors and you want to insure that you are getting good germination on your seeds, a thermostat will ensure that you stay at the perfect soil temperature. You plug a heat mat into the thermostat controller, which has a probe. The probe is kept in the soil so that the thermostat will heat the mat as needed to keep it within a few degrees of your desired temperature.
Do I need a thermostat? Most heat mats have a ‘general’ 20-degree increase so there is a chance that without the thermostat, you are actually reaching too high of ideal soil temperatures and hindering germination rather than supporting germination. We suggest for an intermediate grower to purchace a kit that has a larger heat mat and a thermostat. If you are already happy with your heat mat that you have, we will also link the thermostat that we use below. Please note that many thermostats only allow for one heat mat to plug in and control temperature, so getting one larger sized mat with the thermostat is likely better than having a small heat mat plugged into a thermostat if you are starting more seeds than a single heat mat will allow.
Heat Mat For Large Scale Growers: So what is our current system on our farm where we start thousands of seeds each week? We use the thermostat linked above along with the ‘linkable’ heat mats from Johnny’s Seeds. You will need one of their ‘Master Heat Mats’ that plugs into the thermostat. You can then link up to 7 of the ‘add on heat mats’ and all of the heat mats’ temperatures will be controlled from the single thermostat. This allows us to have hundreds of seedlings germinating at any one time.
Moisture Control During Germination: Whether or not you decide to use a heat mat for germination, you will want to use supplies / tools to retain moisture for germination. Seeds need constant moisture for germination, not too wet and not too dry. Depending on your climate, this perfect level of humidity may be easy or more difficult to achieve. Here in Utah where we grow, it is extremely dry so keeping the soil moist and humidity present for germination is important to manage.
Humidity Domes: We have been purchasing humidity domes to put over our germinating seeds over the past few years. This has made a huge difference in germination and in how often we have to check for moisture. I will link some humidity domes below that we have bought, but in all honesty, we normally purchase these Domes from Harris Seeds.
Humidity Dome Alternatives: If you are on a budget, you can also start by using plastic wrap or ‘cling film’ to cover your seedlings. I have had some unfortunate experiences with plastic wrap lifting the seeds up off of the top of the soil.
Watering during germination: We always recommend bottom watering your seedlings so that you don’t displace your seeds. If you are using a moist medium when sowing your seeds (recommended) you may not really need to water while they are germinating if a dome is used. However, it important to check the moisture on your germinating seeds daily until you get a feel for how often they need to be watered. Once 50%-75% of the seeds have germinated, you can remove the humidity dome and pull them off of their germination station. (If you are using cling film, set it in a way that it can dry so you can reuse it.) *See the info below on mold/algae growth and fungus gnats, common issues that come with soil moisture management, and things you might need to deal with during germination.


Growing under lights indoors will provide much stronger and sturdier plants compared to starting seeds on any window sill or even in greenhouses. Below I will share about our grow space setup and other valuable considerations.
Setting up A Grow Space
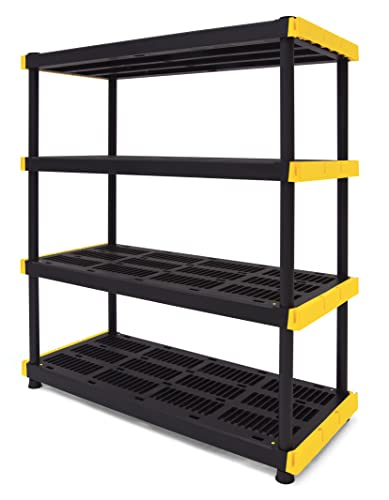
Shelving Unit or A Place to Set up Your Indoor Growing Space: You don’t have to use a shelving unit but you can grow a lot of seeds in a compact space by using a shelving unit. There are countless shelf options. We started out with plastic shelving units (linked below.) But many people like using metal shelving and choose the ones with wheels. We have not used the specific shelf linked below, but I did upgrade ours to metal rolling shelves that I found used on my local online marketplace. I know many people also get them at Costco. We also tried using this shelving unit from IKEA for a year and it was a great value. However, it is really only a good fitl if you primarily use soil-blocking instead of plug trays due to the shelf depth, but we now use it for storage.
Adding a Shelf Liner: Watering your plants with lights below your plants takes extra precaution. We did burn out a light one year from water dripping into the electrical and frying it from above. As insurance, I suggest using shelf liners so that water rolls off the side of the shelving unit instead of below onto your grow lights. I will link some below.
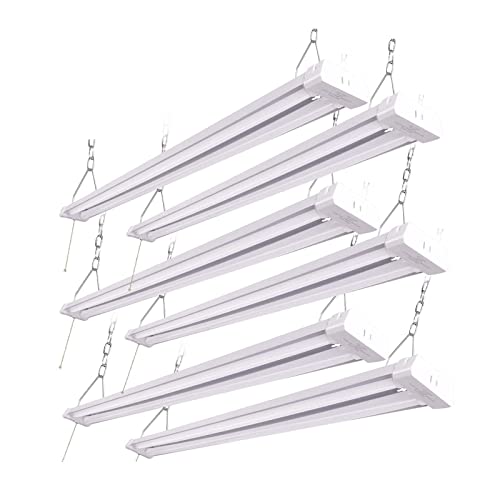
Choosing Your Lights: There is no need to be intimated about the selection of lights. Linkable LED shop lights work great and there are plenty of options out there for you. The lights linked below are two that we have actually bought and used. For each shelf that you plan to grow on, you will want two lights, hung side by side. Alternatively, if you don’t want to use a shelving unit, you can hang these lights over a table or another surface to grow your plants on.
LED Light Height: You will want to adjust the height of the lights as the seedlings grow, keeping the lights about 3 inches above the plants (or, alternatively, putting something underneath the seedlings to raise them toward the lights.) Having these lights close to the seedlings prevents them from stretching/reaching and becoming ‘leggy.’ (This is only for LED lights that do not generate heat, if you are using other types of grow lights, you will need varying distances from the seedlings.)
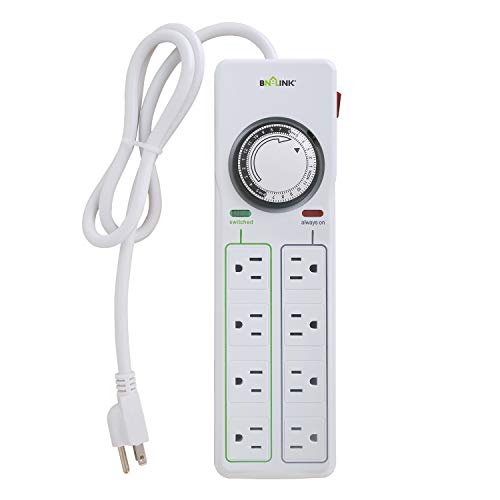
Save Your Sanit, Use A Timer: Using a timer for your lights is (in my opinion) essential. The one linked below is the one that we use, 4 of the outlets are set with the timer and the other 4 outlets are ‘always on.’ Generally, you will want the lights on for 16 hours per day and off for 8 hours per day so a timer helps you easily manage that.
Growing Indoors Under Lights:


Other Valuable Considerations:
A fan for Airflow: An oscillating fan is probably something that I would consider an essential, especially if you live in a more humid environment. Having a fan in the room mimics the natural wind that the seedlings will face; it helps them grow stronger stems and reduces the transplant shock. It also reduces root rot and dampening off.
Temperature control: Additionally, if you are growing in your basement or in a cold place in your house, a thermostat-controlled space heater can keep the room at a warmer temperature for your seedlings.

Oscillating Fan:
Thermostat-Controlled Space Heater:

Now that your baby seedlings are under the lights and growing, it is time to care for them- watering them, feeding them, and problem-solving as needed.
Watering Your Seedlings:
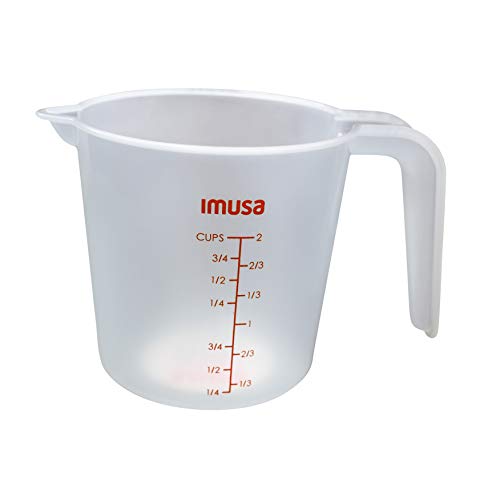
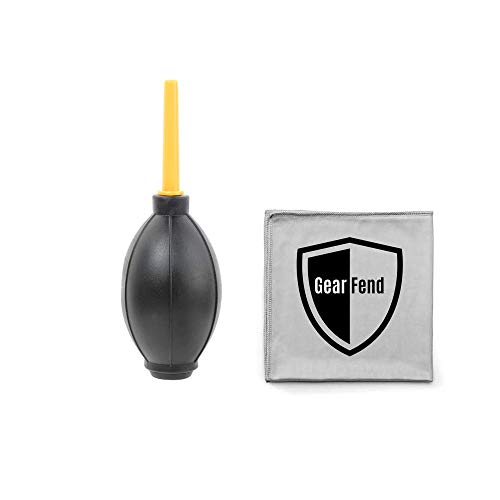
Watering Soil Blocks Soil blocks require bottom watering. The best way we have found to water soil blocks efficiently is with a bucket of water and a liquid measuring cup (I will link some below but honestly I bought several of each at the dollar.) I dip my measuring cup into the bucket and pour out as much as is needed onto my tray for the blocks to soak upwards. You will need to experiment and dial in how much water it takes to get all of the soil blocks evenly moist without leaving standing water afterward. My other favorite tool for soil blocks tray is an ‘air dust blower’ (with a removable tip) this works great to suck up any extra water from the trays and spit it back into the bucket (trust me- this is much more secure than pouring off extra water from the corner of the tray and risk messing up the blocks.) You do not want to have stagnant water on your trays and this tool is a favorite. I will also link the actual assorted kit that I bought that has the air dust blower in it along with some other helpful little tools (we use a lot of these for random potting and planting stuff and love the acm wash bottle that is included for watering as well.)
Watering For Plug Trays: We still use bottom watering for trays because it allows the soil to pull water up evenly (think like a sponge) rather than top watering. This is primarily because when the plug trays are on the shelf, it is much easier for me to come through with a narrow nozzled watering can and put water in the tray than it is to water the entire tray from the top. It also feels like it is quicker because i can just stand in one place and pour tray to tray instead of moving the water all around. This is also why I like the shallow bottom trays instead of the classic 1020 trays, you do not have to lift the plants to bottom water.
Feeding Your Seedlings:
Do my seedlings need fertilizer? The general rule is that you do not want to feed your seedlings until they have their first set of ‘true leaves’ (not the very first set that you see after germination, but the next set.) But even then, I know lots of growers who do not fertilize until planting. A lot of it depends on how young you are transplanting your plants. If you are getting them in the ground while they are little, the need for fertilization is not as crucial. However, if you are growing it in that soil for a longer amount of time you will want to consider providing some kind of nutrients.
My Approach to Seedling Fertilizer: I now use wool pellets (linked above in the soil section) in my seed starting mix because it acts as both a quick and slow release organic fertilizer, meaning that the seedlings can get nitrogen from the wool pellets. If I am growing something like tomatoes, where I will have them indoors for 3+ months, I will also foliar feed with fish and seaweed a few times (if the weather permits me to take them outside.) More on this below.
Synthetic vs Organic Fertilizers, Choosing the Right One: There are synthetic or organic sources of food for plants (in this terminology, organic doesn’t always mean certified organic but instead it means that it comes from an organic source such as a plant or animal.) Most organic fertilizers are not immediately available to plants through their roots (with the exception of wool pellets) they take weeks or months to actually be able to feed the plant. Synthetic fertilizers (which I don’t use so I cannot provide advice on) can be slow-release or immediately available. If your seedlings as visibly struggling, foliar feeding with an organic fertilizer or using a very very very diluted synthetic fast-release fertilizer while watering would be how you would feed them.
Watering Down Fertilizers: If you want to provide fertilizer for seedlings, you will need to water it down much more than the full-strength dosage for these young plants. Too much fertilizer can ‘burn them’ and even kill them.
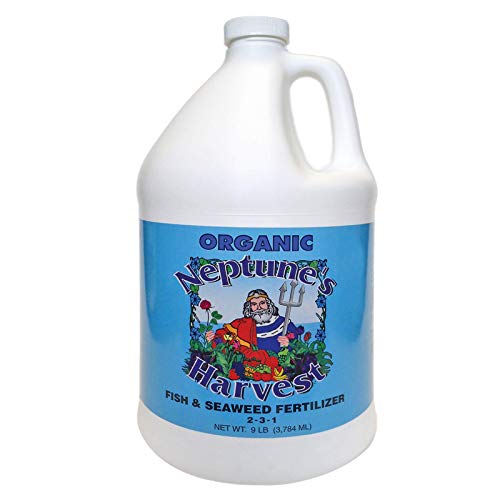
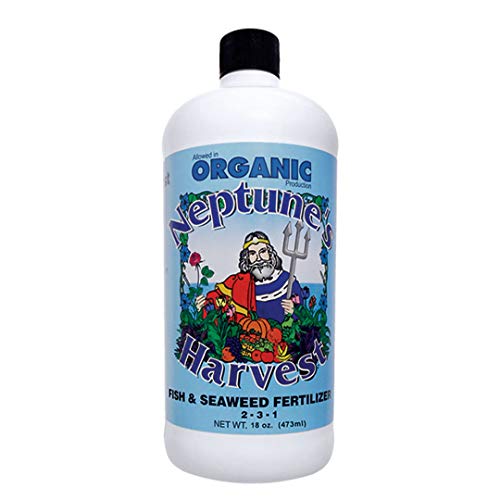
Foliar Feeding: Some folks recommend foliar feeding their seedlings once per week. Foliar feeding is essentially getting the nutrients onto the leaves of the plants through an overhead watering can or pump strayer (it is totally fine for it to soak the soil too.) . We use a Fish and Seaweed fertilizer for foliar feeding because the seaweed has lots of great benefits in addition to the fish (be warned, it is smelly.) You will want to use this outdoors. I have linked the supplies that we use below. But honestly, I don’t think you even need to worry about this unless you want to give your plants a boost in health and even then, you definitely don’t NEED to do it weekly. I have actually killed plants by taking them outside to foliar feed and drip dry when it was too cold for them- so really be logical in your decisions on this rather than routine about it. One last note, do not keep any fish emulsion water for a later use. If you fill a pump sprayer, make sure you use it all, spray out the sprayer, and keep it open. This stuff continues to get more and more stinky the longer it sits so use it or loose it.
Troubleshooting Common Issues
Algae/Mold on the soil or Dampening Off: You need some airflow and less moisture if you are seeing this. It is not a huge problem if the plants are still alive, it just takes some correction. An oscillating fan (linked above) is valuable for keeping airflow moving. Insure that you are not letting your soil get ‘soggy’ when you are watering, it should be evenly moist with the opportunity to start drying out before you water again. If you notice algae or mold while you have a humidity dome on for germination, allow a corner to be propped up to allow some airflow inside. If you have a humidity dome on after germination, take it off. Adding a squeeze of hydrogen peroxide to your waterings can be beneficial (again a dash is good- it is H202 and not going to harm your plants.) You can also add cinnamon sprinkled on top of the soil as it is antibacterial We buy Costco-sized ground cinnamons and several two-packs of hydrogen peroxide each spring.
Fungus Gnats: Fungus gnats are a very very very common thing to deal with whenever you are working with bagged soil products or indoor plants. These little fruit flies lay their eggs in the soil and they are often already in bags that you buy. There is no need to panic. Here is your protocol:
Step 1: Acceptance. Accept that this is normal before it even happens. Accept that it is also totally possible to handle them without chemical pesticides.
Step 2: Preparations. Go ahead and stock up on that hydrogen peroxide because when you start seeing them, you will want to add dashes of hydrogen peroxide to your water for watering; this will prevent populations from growing (targeting the eggs in the soil.) It is also a good idea to buy some yellow sticky traps (linked below.) We keep these on hand and go through a lot each spring. We usually see them on the sticky traps before we notice the fly themselves. They are attracted to the yellow color and will go and land on the sticky trap, getting stuck. This allows you to target the adult population as well. You may have a lot of gnats or you may have a few eventually, you will have them. If left unchecked, they can damage your seedlings but we have never actually had this happen with the combination of peroxide and sticky traps.
Yellowing / Lime Green Leaves: This means that your plant is struggling and I would guess that it is a fertilization issue. It could mean that your soil is not staying evenly moist enough if you haven’t watered consistently (water helps plants pull nutrients from your soil mix.) But , it also just may mean that it needs some fertilizer. See the fertilization information above.
Powdery Mildew: While it is not as common to get powdery mildew when you are starting your own seeds, I have gotten plants from nurseries that had powdery mildew and brought it into my space. Trying to keep it separate from your other plants is important as it can spread. Try to keep your fan from blowing it onto your other plants. Use a milky water foliar spray to help fight it. I like to keep powdered milk on hand for this reason.
Spider Mites: Yuck, the worst. Last year was my first time having a small infestation of spider mites in my seed starting room. This happened after having some plants that were struggling (pests are attracted more to struggling plants than healthy plants) and bringing them indoors to nurse them to health. Spider mites reproduce very quickly. I used an organic approach of putting on a nitrile glove and squishing them by hand every few days. Once the plants were ready to be hardened off, I used one of my rolling shelves (linked above) and some frost cloth to enclose the plants with airflow and released some ladybugs. The ladybugs took care of the last of them for me. Chemical control is available but please do your research.
Caring for Your Seedlings:


Hopefully, this helped you get a better idea of what it takes to start seeds indoors. Over the coming weeks we will be sharing more on our instagram page about our seed starting each spring so make sure you are following us to see what we are up to.
We worked hard to create this resource and I would love to keep our blog posts add free.
If you found it helpful, and would like to keep our blog posts add free, consider supporting our work in the following ways:
Purchasing items through the Amazon Affiliate Links Above
Sending us a Venmo tip (search for: together-webloom under the business tab category.)
Engage with us on social media and share our account to further our reach.
Thank you for supporting our small farm with BIG DREAMS. Don’t forget to sign up for the newsletter so you can see our future blog posts
♥With love, Taylor and your friends at Together We Bloom